Zipline Barbie
Who knew that we could live out our extreme zipline fantasies vicariously through our doll collection? One of the constants in math education is the applications of a right triangle. Slope, Pythagorean relationships (including distance formula), SOHCAHTOA, angle of elevation, and even physics are easily integrated into a right triangle diagram. Piggy backing off the experiments of Matt and John, a couple of teachers you really should check out if you haven’t already, we incorporated the zipline project into our unit of study on right triangle trigonometry.
Introduction:
We started with a simple question: “How tall is the flag pole?” We gave the students a lab form to record their measurements and guide the process of the calculations. They used basic measuring tapes and home made clinometers. There were 5 of us teachers collaborating on the experiment, and we tried at least 4 different styles of clinometer. The most successful and accurate clinometer was also one of the most simple. A teacher in our group found the following tutorial video with accompanying worksheet.
To make the tool more sturdy, we used cardstock for the clinometers. For accuracy in our estimations we have each group of 2-3 students take at least two different measures, and we collected the data from the entire group using a Google form.


Based on the estimate from the students we could probably guess that the flag pole was somewhere between 25 and 45 feet. The first part of the lab also included a picture of a male student 6 feet tall at the bottom of the flag pole. I was hoping that collecting data from all the students would present some type of middle number, but this data wasn’t clear. So the head custodian and I did it the old fashioned way. We taped a measuring tape to the rope that raised the flags. The actual height: 40 feet. This created a good feedback question of why was the data off for some students.
Deeper Understanding
The middle of this lab was not exactly “open”, but we tried to leave it up to the individual teacher to develop an understanding of applying SOHCAHTOA type relationships to calculate unknown segments of a right triangle (imagined or real). A couple of us teachers had to schedule around a pull out workshop in the middle of the week for another of our classes. During this time teacher’s were encouraged to introduce the second part of the lab. The intended goal for this section was to get the students prepared for the final showcase at the end of the week. We chose an angle of elevation of 15 degrees based on having 200 feet of rope and a vertical height of 40 feet. The most shallow angle we could go for was about 12 degrees. Before we get into how this angle should be chosen, let’s explore an alternative approach that would let the students arrive at a desired angle.
Proof of Concept (the part we plan to fix)
Us teachers wish we did this piece (and our students probably do too). For future interations of this experiment we plan to do a small scale version inside the classroom. This would help the students better prepare for the large scale predictions, and incorporate more students into the hands-on application of the concept. Large scale demonstrations are a spectacle worth waiting for, but without the small scale proof of concept, one runs the risk of having some of the participants become more spectator like.
Some brainstorming we had for this proof of concept experience included using string or twine instead of rope for the zipline, yardsticks/metersticks for the pole, and a paper clip for the zipline trolley. For our curriculum pacing this unit of study followed another unit on proportional relationships. This would allow us to have the students apply proportional measurements for the small scale and large scale experiments. This small scale version can be translated more simply (if extra scaffolding is necessary) using inches or centimeters in place of feet/yards/meters for the large scale. One could also make the proportions more challenging by just picking a stick and saying that its height needs to be the same as the flag pole. A 36 inch yard stick needing to match a 40 foot pole requires more skill than a just a simple 1 foot = 1 inch. Keeping in line with the spirit of small scale proportions, we could also use lego size figurines instead of standard barbie size.
Digital Diagrams
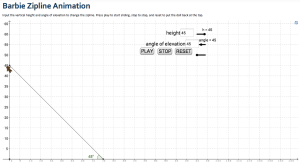
The largest value in doing the small scale experiment would be getting the students to decide which angle of elevation would be appropriate. Typical zip lines have a safety guideline of 6%-8% grade of decline (about 05 degrees). Most students would view this angle as slow and boring. Letting them experiment with various angle in the small scale would allow them to come up with something more exciting. As students decide on a particular angle and height, they can use a digital application like Geogebra to construct a diagram of the zip line. I created an applet that lets the user input an angle of elevation, the height, and watch a doll go down the zip line. To try and make the experience a little more life like I tried to include the physics equation for an object sliding down a frictionless plane. Applets like this one can be created ahead of time and uploaded to GeogebraTube for free. Click the image to open the interactive applet in a new window.
Large Scale Finale
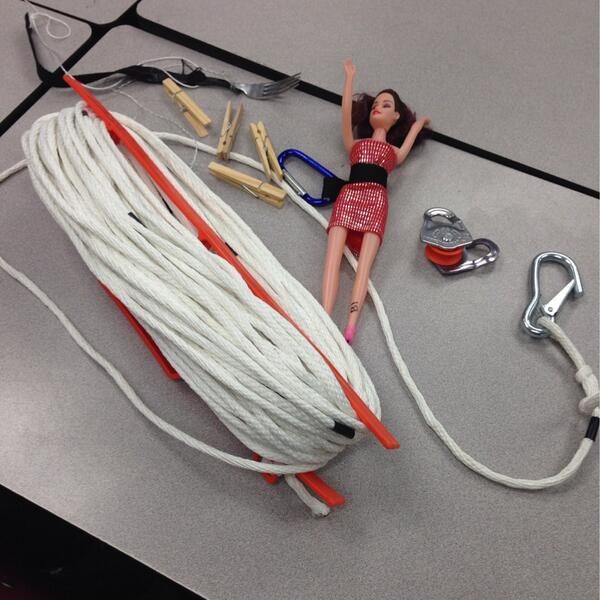
Tools:
- 200 feet of rope (less than $20 at local hardware store)
- Basic hooks and/or carabiners to connect rope to flag pole
- Trolley/Pulley (I bought this one off amazon for $15)
- Release mechanism: pincher of some sort attached to string to be pulled off rope (we used a fork, others use a clothespin)
- Doll(s)
Warm-up questions (and potential answers)
- How much ground distance gives us an angle of 15 degrees? (about 150 feet)
- How can we measure 150 feet? (find out how long a building is an compare, count 50 paces at approx 3 feet each)
- What else is worth considering (trees, clearance, something to anchor to)
Once the students pick a couple of different landing zones, we started the experiment. We anchored the rope, pulled the release, and
Future Plans
Having so many students in one grouping focused on one specific activity had its ups and downs. Involving all, or at least most, of the students in this experience was our biggest challenge. Many were engaged in the activity so going to extra effort to be inclusive was not much of a concern, at least not at first. I asked the students to provide some feedback on a Google Form. The positives from the feedback was they enjoyed seeing students from other classes and receiving direction/facilitation from other teachers (in other words variety was a plus). A consistent suggestion for improvement was to involve the students more in the process of the large scale zip line. By the end of the day we made some adjustments to add in the following.
- Confirm the students prediction of 150 feet using the rope as a measurement (the rope had been marked with electrical tape every ten feet to create a somewhat accurate measuring tool for long distances)
- Bring the clinometers back out to confirm that 150 ground distance created a 15 degree angle by matching the scope parallel to the string. This could also serve as a way to confirm the data that the flag pole is in fact 40 feet high.
- Let students roll out the rope to the desired distance and pull the release line.
- Anyone else: You get to be a movie director, documenting the event. We want this to go viral. Put it up on any and every social media network you can. #barbiezipline or#ziplinebarbie . (We really need to hype this part even more the next time).
All in all, big success and Barbie made it to safety with her main squeeze Ken.
Posted on February 17, 2014, in Geometry, Projects. Bookmark the permalink. 4 Comments.

Fabulous. And your discussion of the process and improvements will help you next year (and others before then).
Thank you for the inspiration
Thank you both for this inspiration. I am definitely doing Barbie Zipline with my students. I love how you documented everything, including with the video! I am a bit of a slow learner, but I may need some “tech support” in figuring my process out. I appreciate your thoughtful and fun ideas!!!!!
– Elizabeth (@cheesemonkeysf)
Pingback: Geometry Right Triangles unit project: Barbie Zipline Day 1 | Crazy Math Teacher Lady